"I begin with an idea ... and then it becomes something else"
~ Picasso

Showing posts with label Carolyn Saxby Textile Art. Show all posts

Saturday, 1 February 2020

February hearts

January gently passed.

In a tiny corner of my rented apartment I opened up a box of hearts and spread out with some carefully considered work I have yet to share.  I enjoyed the feel of the fabrics again, stitched with love and deep emotion.

Although winter remains my favourite season, I have struggled with the Cornish storms and constant mizzly rain of recent months.  I find myself longing for spring and light and sunny bulbs.  I find myself longing for yellows, soft blue greens and a home of my own, a studio to work in, space to spread out with my thoughts and a cosy armchair.  Things will gently fall into place, I'm sure.

These hearts are spring and summer … memories and hopes … of walks on the beach, little Cornish cottages and time spent looking for pearl shells and dark mussel tangles.

One or two of these hearts were featured in Maggie Grey's WOWbook 4.  I was very kindly invited by guest editor, Lynda Monk, to make some work for the alphabet series featured in this issue which was published in 2019.  "B" is for beaches and beachcombing (something I have always loved since I was a little girl) and there evolved twelve hearts, three for each season.

I very much appreciated being asked by Lynda to participate in this wonderful textiles book.  The invitation came at a difficult and dark period in my life, when I was doing very little creatively, and when my focus was simply trying to get through the days.  I look back at this collection of work with grateful thanks to Lynda and Maggie.


I would also like to take this opportunity to give many thanks to Anne Kelly for inviting me to share work in her book "Textile Folk Art" which was published in 2018.  Anne very kindly selected two stitched collage pieces, a nostalgic one called "the sparkle of the water" and a slow stitched piece called "faraway cottages" … inspired as always by the sea and the sky and the wonderful feeling of just being in Cornwall.  I will write a little more about these pieces and how they were inspired another time.


1st February 2020 - and I have a very busy week ahead, but my online shop will open today.  These hearts and other work will find their way there over the course of this week.  You will find I am still working at a slower place at the moment, there is no rush.  I am currently limited with space to work and also trying to buy a house/studio.  If you are interested in a stitched piece, please keep checking back from time to time and I will also post updates on FB and Instagram when work is listed.  I very much appreciate all interest in my work and wish you all a very good weekend - Carolyn x

Wednesday, 7 March 2018

Snowed in


Well, that was an interesting week with the weather!


The "Beast from the East" meets "Storm Emma".  Siberian snow and 60mph winds meant we had a good 8 to 12 inches of snow in places with deeper drifts.  The "fuss" is that we don't get snow like this in Cornwall, not that often and not this thick!

We were snowed in for two days but it felt much longer especially when we had three power cuts, the longest for four hours.  We were very grateful for our wood burner and a well stocked fridge.

It all looks so pretty through the window but feeling cut off and isolated makes you realise how much you take everything for granted ... especially electric, keeping warm and making tea!


The snow has inspired my collages this week.  We are now on week 10, following the theme called "decollage".  Adding lots of layers and then tearing back to reveal images underneath.


"darling girl"

I used an advert from a 1950s magazine, a beautiful tarnished spoon, a snowy landscape, a few snowflakes from a card insert and some gelli printed tissue paper.  I like the feel of this one but I deliberated over whether to fill the white space, and then decided not to.  It Is enough.


Only last week ... I said I would be making only one collage a week from now on!  However, I find I get on a roll and this week I wanted to try working a collage on fabric.  This one has a cotton linen backing.  I worked some white gesso over it to prime first.  Then I collaged the same as I would on paper, using the layering/tearing back technique for this week.


follow in nature's footsteps

Other elements are waxed sewing pattern paper and a skeleton holly leaf from my garden.  The bird is a "blackcap".  The collaged background remains soft enough to handle and stitch into.  I have put it to one side to work on over the next few days.

My collages are 5 x 5 inches in an 8 x 8 inch sketchbook for week 10 of the collage project that I am doing with my sister Evelyn following the weekly prompts in The Collage Workbook by Randel Plowman
"snowed in"

Also on my desk ... a snowy heart I have been stitching with lots of layers of thick chiffon snow and glittering snowflakes.  I used some of my painted textured cotton fabric too which, as I used it, made me think of compacted snow ... you know when snow has uneven bumps and ridges.
I also have winter beachcombing on my mind and I've started another with very pretty beach finds including a tiny barnacle, pearl shell and a lovely mussel.  The simple pleasures of admiring sea treasures, taking time to select fabrics and quietly stitching a shoreline walk.


I will share the snowy one and the winter shoreline walk quite soon.  Meanwhile, here is one I found when I was sorting through a box in my studio.  I made it a while ago and it's one of only a few that I have left in my personal collection.  The two baby mussel shells are still attached in a tangle to the mother shell.


"along the beach"

Thank you for visiting me here x

Sunday, 9 July 2017

Surface Treatment Workshop - week 18

I'm really enjoying this weekly project, exploring techniques and products that are both familiar and unfamiliar.  When it's a technique that I am used to I try to take it in a different direction, other times the products are familiar but the technique is new.  This happened for me with ventilation tape.  I am used to this stuff being around at home as my better half was a heating and ventilation design engineer ... but using the stuff in art ... there's a thought!!!

Ventilation tape is also known as duct tape or insulation tape and is a heavy duty silver foil that comes on a roll.  It is adhesive and is very, very sticky when the paper backing is removed.  Before removing the paper backing, the prompts suggested etching a design onto the tape with a pencil, but I found a needle achieved a sharper design.


I etched small designs onto the tape, cut the tape into strips, peeled off the backing paper and applied the tape to a background.  It is still possible to work more etched design at this stage, so I added a little more pattern.


Then, using acrylics, I painted over the etched texture, first with Cornish colours and then a pearl white over the top.  The acrylics, I found, had to be applied almost neat for them to stay on the foil.


I have to say ... I really enjoyed creating this with no agenda.


Next, I decided to explore etching a little more using a sharp needle for a finer line and inspired by some old bottles and Carn pottery on my studio windowsill.  I peeled the backing off and applied the tape to some tags first before etching and then coloured the bottles with turquoise acrylic ink to compare to acrylic paint.  The tape took the ink better but took a real age to dry completely (overnight).


I wanted to see if I could get a "rubbing" from the design on the right.  It was very fine, so I had some difficulty with it.  Despite trying with pencils, oil pastels, soft chalk pastels and crayon on tissue paper my image was very faint ...

Lastly, this is a useful one for creating texture in artwork ... etching marks and lines on the ventilation tape, then scrunching up to create lots of texture, then painting with acrylics.  I used pearl, blue and paynes grey.  It still has the backing paper on it which can be used to help it adhere to art work, although this was compromised in the wet (painting) stage.  I would recommend using additional glue to fix.  I like that the etched lines are still visible despite the severe scrunching I gave it.  No doubt, this will be useful in painting or collage in the future.


So that was a quick post on ventilation tape.  I did enjoy this week's technique and will be using it in my work.  Next up is "embossing" which I have already done in readiness for Wednesday's post.  Yes, "Workshop Wednesday" will actually arrive on Wednesday this week!

Have a great week ahead everyone ... play lots! x

Tuesday, 27 June 2017

Surface Treatment Workshop - weeks 14 and 16

I have persevered with the "skin" samples for week 14 of The Surface Treatment Workshop, spurred on by the purchase of some Liquitex gloss gel and a bit more time to play.  Liquitex gloss gel is such a fun product to play with and dries clear and jelly like.

I applied the gel quite thickly onto the top of a plate which I had previously been using as a palette.  My palette still had leftover dried on paint and some newspaper print too.  I spread the gel over the paint and newsprint and sprinkled mica powders on top with a little water.

As the gel dried, it became clear and the paint and print beneath could clearly be seen.  After a while, it set hard and I was able to peel it off.  A "skin" is basically a "peel off".  This is how it looks on the top of the skin ...

 
and this is the back of the skin with the paint and newsprint ...


The sample below is more Liquitex gloss gel with gilding flakes embedded in the gel.  It starts out white and dries clear.


I pushed the gilding flakes into the paste with a soft paint brush and added some watered down mica powder which collected around the flakes.


This is the finished skin ... it's translucent but against a white background this doesn't show up well.


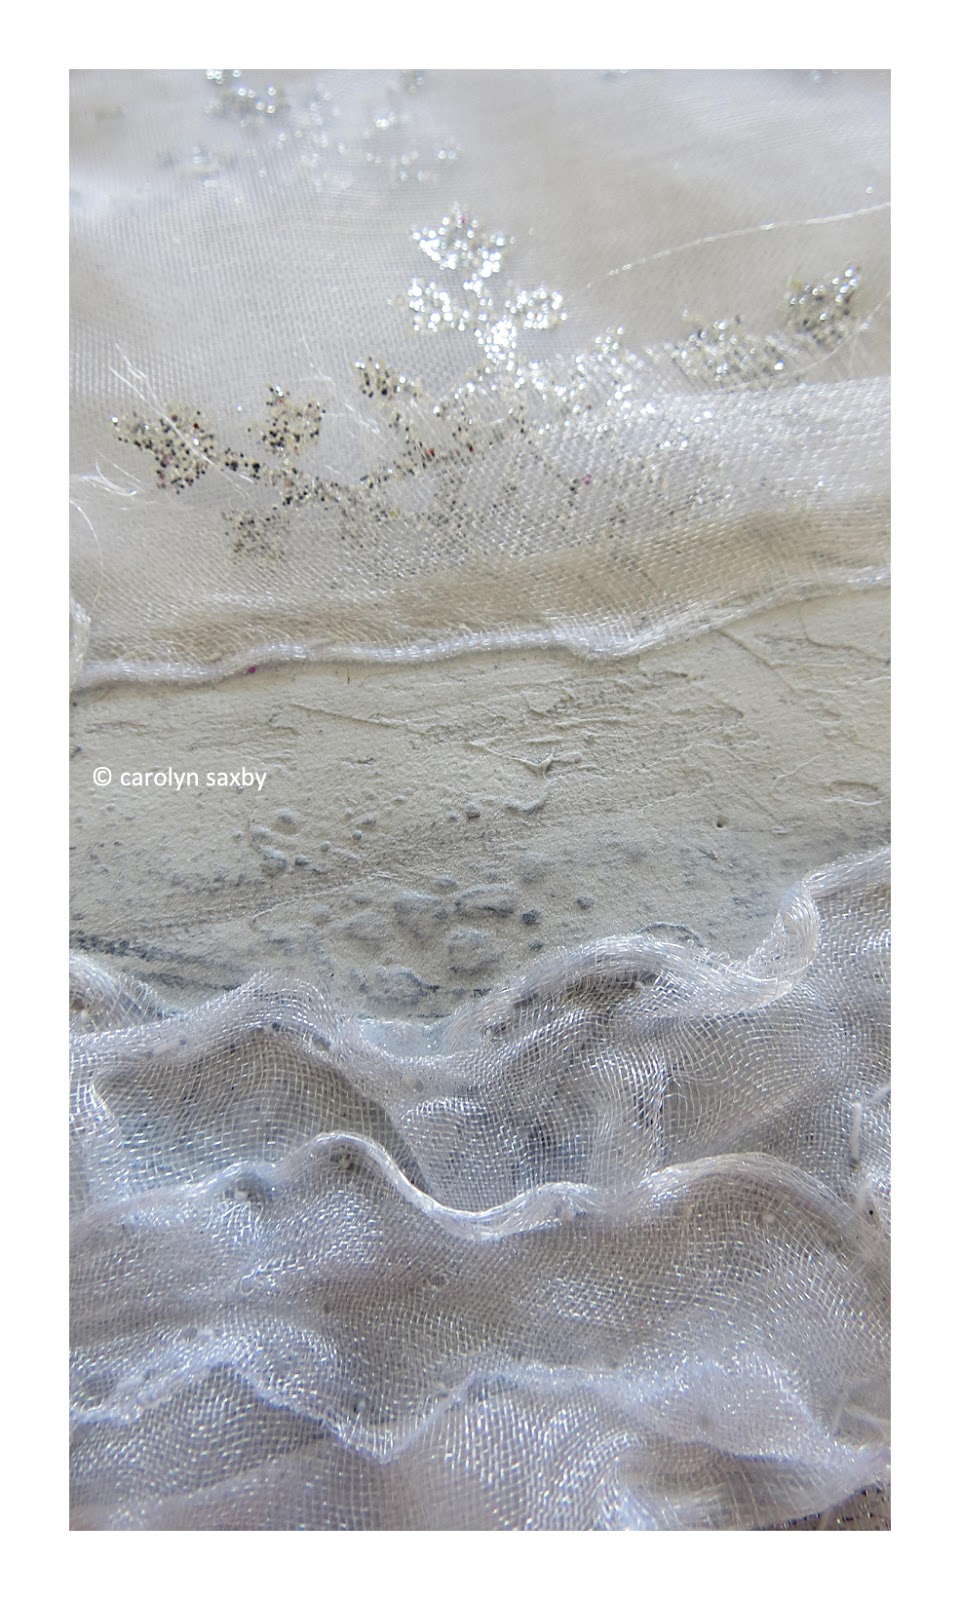
This is my peeled off molding paste skin with image embedded, finished with phthalo turquoise and glazing gel.  The skins made with Liquitex gloss gel and molding paste are pliable and thin enough to stitch into, if desired.


Below, I used white acrylic paint, thickly applied, to make this skin.  I swirled a little gold acrylic into the white.  This one took ages to dry out, before I was able to peel it off.  I'm not really keen on it either, as it has a plastic feel and appearance, but it is thin enough to stitch into if desired.


I discovered that molding paste takes rust very well.  I spread the paste on the piece of rust and left for several days.  When it had dried out thoroughly, I was able to peel the molding paste skin from the rusted metal and with it came quite a lot of the rusty texture!  If rust is your thing, this might be a useful technique as the skin is pliable and could be stitched into for layering in art work.


The last skin (paynes grey thinly applied) resulted in lots of tiny peely bits which I decided to keep for adding texture in collage.


I decided to use some of these bits in one of my samples for week 16.  The acrylic "peels" adhered on this "pulled paper" sample quite easily with a common or garden glue stick.


So, week 16 is "pulled paper" which is a way of adding text and texture to collage and artwork to give it the grungy, layered appearance of old ripped posters.  It's a lot of fun building up layers ... with interesting and unexpected results.  You never quite know what's going to happen when you rip it off!

I used mod podge, but PVA glue or other mediums work just as well.  Brush the glue of your choice onto a painted surface and then apply some paper with text or an image, text side down. Leave the text on for about a minute or so and then pull the paper off.  Mod podge is quite a cheap product to use and I like it's matte appearance which is great for the layering part.

Here are some of my finished pieces and some details ...


These book samples tie in quite nicely with the next challenge, so here is a little glimpse ...


In case you're wondering, there was no week 15 as the material to try was Krylon "spray webbing" and I have found it's pretty hard to come by in the UK.  I especially wanted to try silver spray webbing but I couldn't get any.  I have given up with it for the time being.

Finally, if you follow my posts on your mobile phone you may have noticed a different format which I hope you may find easier to read.  If you prefer to read the website version with all my links and twiddly bits down the side bar, then there is a link at the bottom of each post for you to click on and read in the old way.  These days, there are so many techno things to consider.  Personally, I prefer to read and write on my laptop but we all seem to be "on the go" these days that I had a review of things.  Thank you, always, for reading and I would love to know what you think.